Organise contacts with tags and custom fields
Colour-coded tags for grouping, and custom fields for structured data like city, budget or lead source.
Who can do this: Owner and Admin by default (the "Custom fields & tags" permission)Plan: All plans
| Tags | Custom fields | |
|---|---|---|
| What | Colour-coded labels | Extra named fields on every contact |
| Example | Hot lead, Paid, Webinar Oct | City, Budget, Lead source |
| Used by | Inbox filter, broadcast audiences, automations (Tag Added trigger, add/remove tag steps), flows | Broadcast audience rules, template variables, the Update Contact Field automation step |
| A contact can have | Any number | One value per field |
Create tags
- Go to Settings → Fields & tags.
- Under Tags, type a name (e.g. Newsletter), pick a colour — Red, Orange, Amber, Emerald, Cyan, Blue, Violet or Pink — and click Add tag.
- To delete a tag, click its delete icon and confirm. This removes it from every contact and can’t be undone.
You can also create a tag on the fly from the Add Contact form or a CSV import.
Add or remove tags on a contact
- One contact: open it in Contacts → Tags tab, and click a tag to add or remove it.
- Many conversations: use Bulk actions → Add tag in the inbox. See Bulk actions.
- Automatically: automation steps Add Tag / Remove Tag, or a flow’s Tag contact node.
Create custom fields
- Go to Contacts → Custom fields (or Settings → Fields & tags → Custom fields).
- Type a field name in New field name… and click Add.
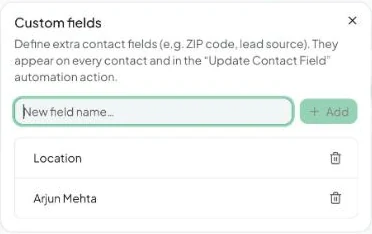
- Rename a field by clicking its name; delete it with the bin icon. Deleting a field also deletes its value on every contact.
Fill in custom fields
Open a contact → Custom Fields tab → type the values → Save Custom Fields. Automations can fill them too, for example from a flow’s Collect input answer.