


WordPress LeadSquared Integration – If you are using LeadSquared CRM to manage your leads and your website is built on WordPress, you have probably faced this problem — someone fills out the enquiry form on your website, but that lead never shows up in your CRM automatically. You either miss it, enter it manually, or it just gets lost in a cluttered email inbox.
We have helped more than 20 companies, educational institutes, and real estate businesses solve this exact problem. From universities managing thousands of student enquiries, to real estate agencies tracking property leads, to coaching centres collecting admission forms — the struggle is always the same.
This article is our way of sharing everything we know so you can set it up yourself, or at least understand clearly what needs to be done before bringing in a developer.
No code. No confusing technical language. Just clear, simple steps that work for everyone from admissions staff to marketing managers.
- Why Does This Problem Happen?
- Who Is This Guide For?
- The Complete Requirements List
- How to Use Postman to Test Your API
- What Data Gets Sent to LeadSquared?
- Setting Up Contact Form 7
- The Full Journey of a Lead
- Uploading Bulk Leads via CSV or Excel
- Common Issues & How We Solve Them
- What Changes After Setup
- What You Should Do Next
- Frequently Asked Questions
Why Does This Problem Happen in the First Place?
WordPress and LeadSquared are two completely separate systems. WordPress handles your website, your forms, and your content. LeadSquared handles your leads, your sales team, and your follow-up process.
By default, they don’t talk to each other. When someone submits a form on your WordPress website, the information just stays inside WordPress — usually sent to you as an email. LeadSquared has absolutely no idea it happened.
To fix this, you need to create a bridge between the two. That bridge is called an API integration. Think of it like a dedicated messenger that automatically picks up the lead data from your website form and delivers it straight into your CRM the moment someone clicks Submit.
Once this is set up correctly, every lead — whether from your homepage, course pages, landing pages, or a pop-up form — flows directly into LeadSquared without anyone having to do anything manually.
Need help implementing this solution on your website?
The expert team at Ixoric Technologies can help you set up the complete system quickly and efficiently.
Who Is This Guide For – WordPress LeadSquared Integration
This guide is written for you if:
➙ Your website is built on WordPress
➙ You are using Contact Form 7 as your enquiry form plugin
➙ You are using LeadSquared as your CRM to manage leads
➙ You are tired of manually entering leads or losing them in email
➙ You want to understand what tools are needed before talking to a developer
Whether you run a college or university, a real estate agency, a coaching centre, a hospital, or any business that gets enquiries through its website — this guide is for you.
What You Will Need — The Complete Requirements List
Before anything is set up, make sure you have access to all of the following. Think of this as your checklist before starting, and how to connect WordPress LeadSquared Integration
➙ A Self-Hosted WordPress Website
Your website must be on self-hosted WordPress (wordpress.org) — not the free WordPress.com version. Most business websites are already self-hosted. If you are unsure, ask your web developer or hosting provider to confirm.
➙ Contact Form 7 — Installed and Active
Contact Form 7 is the most popular free form plugin for WordPress, used by millions of websites worldwide. It powers all your enquiry forms. Go to
WordPress Admin → Plugins → Installed Plugins
and confirm it is active. If not, install it free from the WordPress plugin directory.
➙ Code Snippets Plugin — Installed and Active
This is one of the most important tools in this entire setup — and the one most people miss. The integration requires a small custom code addition to WordPress. The Code Snippets plugin is the safe, correct way to do this. It stores your integration code separately from your theme, so it survives theme updates and never gets accidentally wiped. Install it free from the WordPress plugin directory.
➙ Your LeadSquared Publisher API URL and Token
This is the key that connects your website to LeadSquared. You will find it inside LeadSquared under:
Settings → API & Connectors → Publisher API
The token is a 36-character code with exactly four dashes. Make sure you copy the complete URL — not a shortened version. Also ask your LeadSquared account manager for your
Source
,
SourceCampaign
, and
SourceMedium
tracking values.https://publisher-api.customui.leadsquared.com/api/leadCapture/MzkyNDc=/?token=YOURTOKEN
➙ Postman — To Test Your API Before Going Live
Postman is a free tool that lets you test your LeadSquared API URL directly — before connecting it to your website. Download it free from getpostman.com.
Use it to send a test lead to LeadSquared and confirm everything is working. This single step saves hours of confusion during troubleshooting. We always test in Postman first before connecting anything to WordPress.
➙WP Debug Log — For Monitoring Submissions
This is a built-in WordPress feature that records behind-the-scenes activity. Once active, every form submission will leave a log entry showing whether the lead reached LeadSquared successfully or not. Your developer will enable this with three lines in wp-config.php. It is your real-time window into how the integration is performing.
How to Use Postman to Test Your LeadSquared API
Before connecting anything to your WordPress form, you should always verify that your LeadSquared API URL is working correctly. Postman makes this quick and easy.
Here is how to do it step by step:
- Download and install Postman for free from getpostman.com
- Open Postman and create a New Request
- Set the request method to POST
- Paste your complete LeadSquared API URL into the request URL field
- Go to the Body tab and select raw, then choose JSON from the dropdown
- Enter the lead details — first name, last name, email, phone, course, source, and campaign values — in the correct format
- Click Send
- Look at the response — a success message means your API is working perfectly. An error message tells you exactly what needs to be fixed.
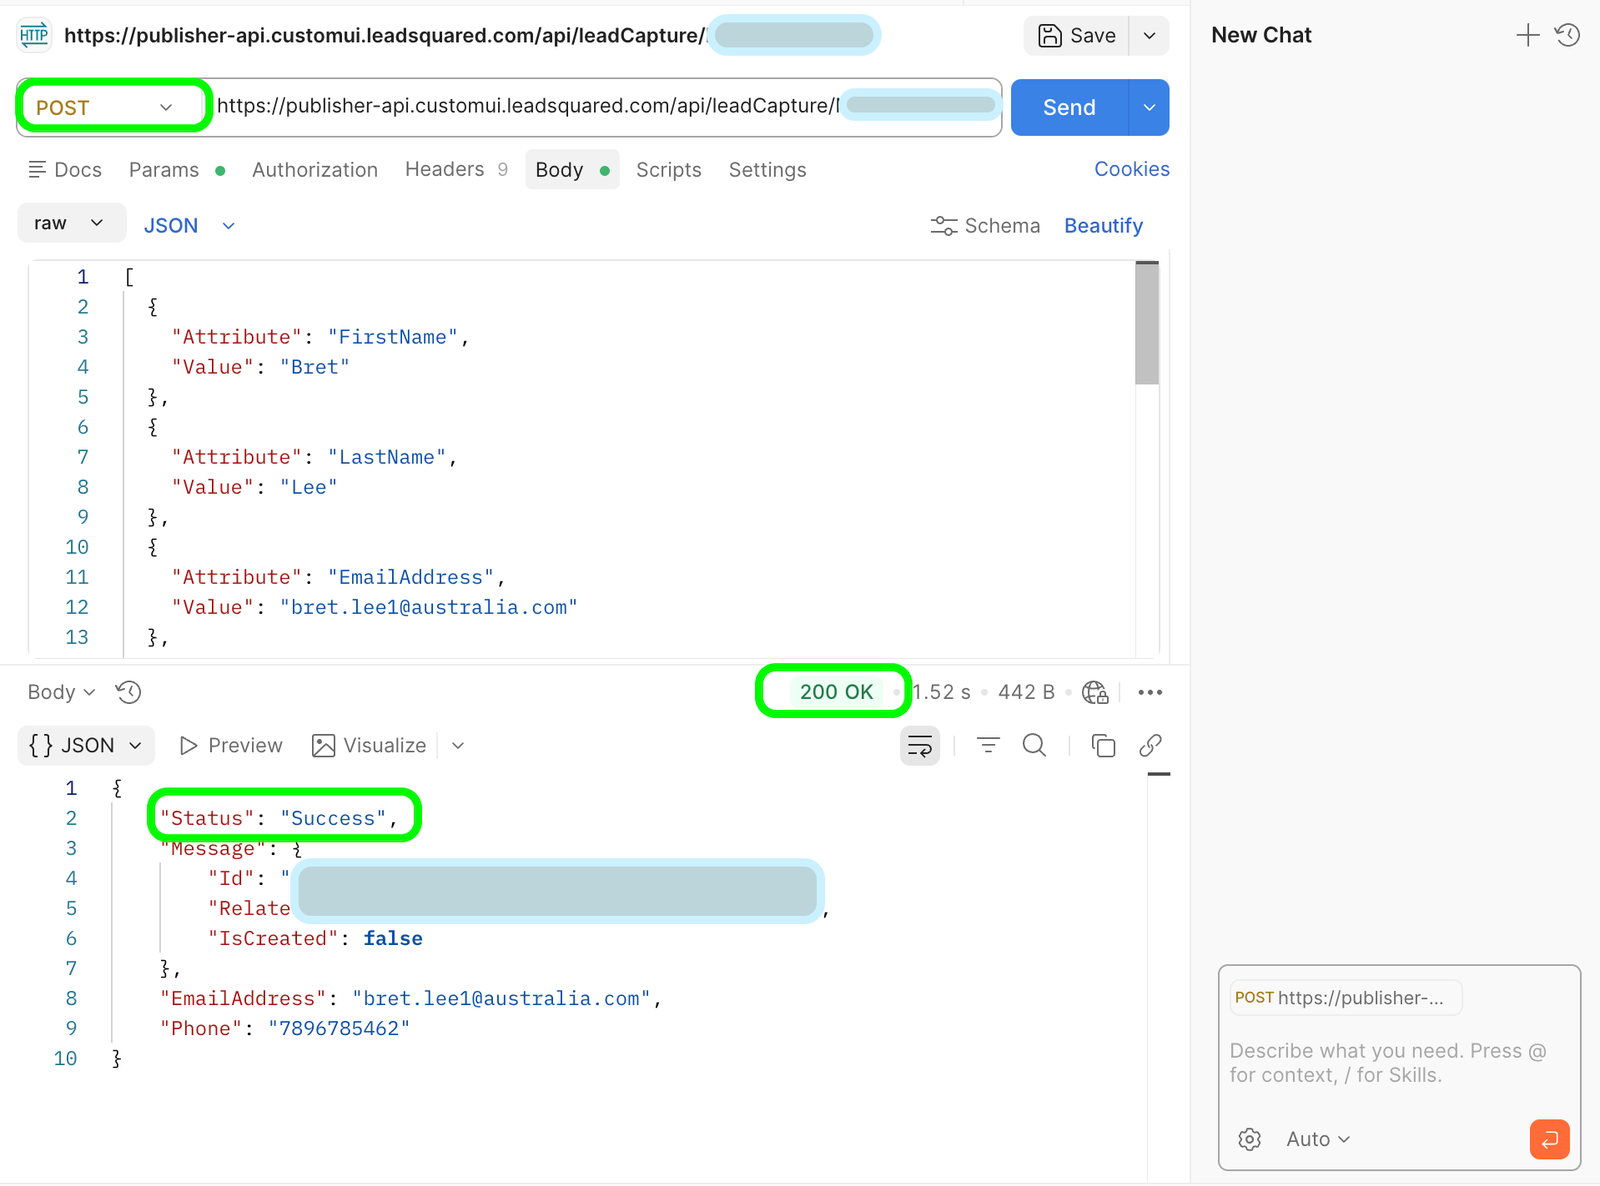
⚠️ If Postman returns an error before you connect anything to WordPress, you know the problem is with the API setup — not your form. This makes troubleshooting much faster and avoids a lot of guesswork.
Need help implementing this solution on your website?
The expert team at Ixoric Technologies can help you set up the complete system quickly and efficiently.
Understanding What Data Gets Sent to LeadSquared
When your website sends a lead to LeadSquared, it sends a structured package of information. Think of it like a delivery parcel — neatly packed with clearly labelled fields. This package is called a payload.
A typical payload for an education institute includes these fields:
Field | What It Means |
FirstName | The student’s or enquirer’s first name |
LastName | The student’s or enquirer’s last name |
EmailAddress | Their email address |
Phone | Their phone number |
mx_State | Which state they are from (custom field) |
mx_City | Which city they are from (custom field) |
mx_Course | Which course they are interested in (custom field) |
Source | Where the lead came from — your website or platform name |
SourceCampaign | The specific campaign tracking code for reporting |
SourceMedium | A medium tracking code provided by LeadSquared |
⚠️ Every field name must match exactly with how LeadSquared expects it. Even a small difference — like an extra space or the wrong capitalisation — will cause the lead to be rejected. This is why testing with Postman first is so important.
Setting Up Your Contact Form 7
Your Contact Form 7 form needs to be set up with specific field names that align with the LeadSquared payload. This is the most common place where things go wrong.
The form should collect: First Name, Last Name, Email Address, Phone Number, State, City, and Course. Each of these fields must be named correctly inside CF7 — not just labelled nicely for the visitor, but named correctly in the form’s code so the integration can read them.
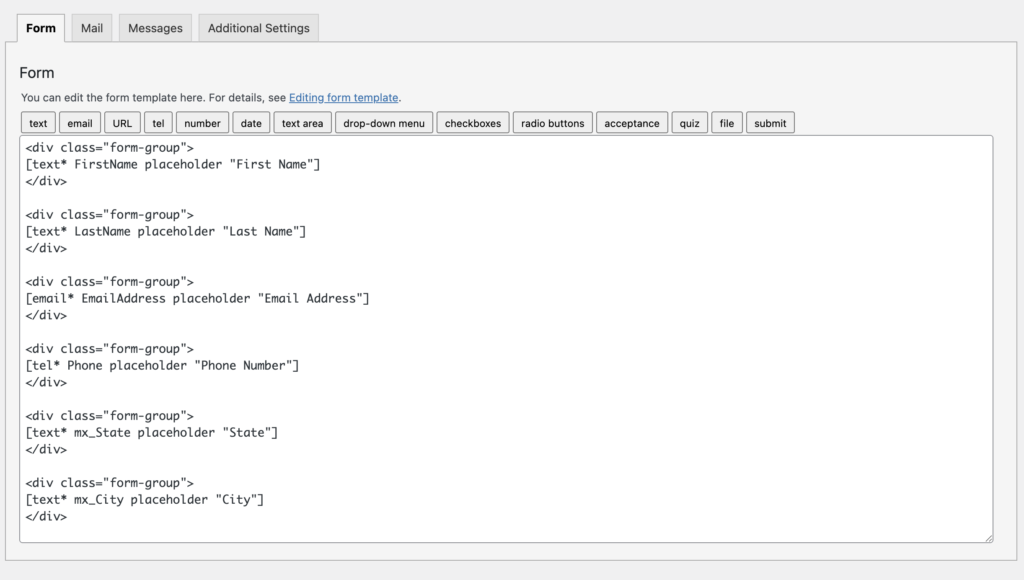
The Course Dropdown
For education institutes especially, the course field should be a dropdown — not a plain text box. Here is why:
- A text box lets students type anything — ‘btech’, ‘B.Tech’, ‘b.tech cse’ — all different, all messy
- A dropdown forces them to select one clean, consistent option
- The selected option matches exactly what is in your LeadSquared CRM
- This keeps your CRM data clean and your reports accurate
You can list every course your institution offers in the dropdown. Students simply choose from the list. Clean data goes to LeadSquared every time.
❌ One important rule: The name you give each form field must be consistent throughout the entire setup — from the form, to the integration, to the LeadSquared payload. Change one without updating the others and everything breaks.
How the Integration Works — The Full Journey of a Lead
Here is the complete step-by-step journey of a lead from your website to LeadSquared, explained in plain English:
➙ Step 1 — Visitor Fills the Form
Someone visits your website, fills in their name, email, phone, selects a course from the dropdown, and clicks Submit.
➙ Step 2 — Contact Form 7 Receives It
CF7 processes the submission — validates the fields, confirms required fields are filled, and prepares the data.
➙ Step 3 — The Integration Fires
At the exact same moment, the integration code (stored safely in the Code Snippets plugin) picks up the form data and packages it into the LeadSquared format.
➙ Step 4 — Data is Sent to LeadSquared
The packaged data is sent to your LeadSquared Publisher API URL. LeadSquared receives it, verifies the token, and if everything is correct, creates a new lead in your CRM.
➙ Step 5 — Lead Appears in LeadSquared
Within seconds, the lead shows up in LeadSquared with all details — name, email, phone, course, source, and campaign tracking. Your team can act on it immediately.
➙ Step 6 — Confirmation is Logged
The debug log records a success entry so you always know what happened. If something went wrong, the log tells you exactly what the error was and why.
✅ The entire process — from form submission to lead appearing in the CRM — happens in under 5 seconds.
Uploading Bulk Leads via CSV or Excel
Real-time form integration handles leads that come through your website. But what about leads that come from other sources?
➙ For example:
- A college fair or education expo where you collected physical forms
- An offline event where attendees gave their details on paper
- An old Excel sheet from a previous admission cycle
- Leads collected through a third-party platform or campaign
- Data from a previous CRM that you want to migrate to LeadSquared
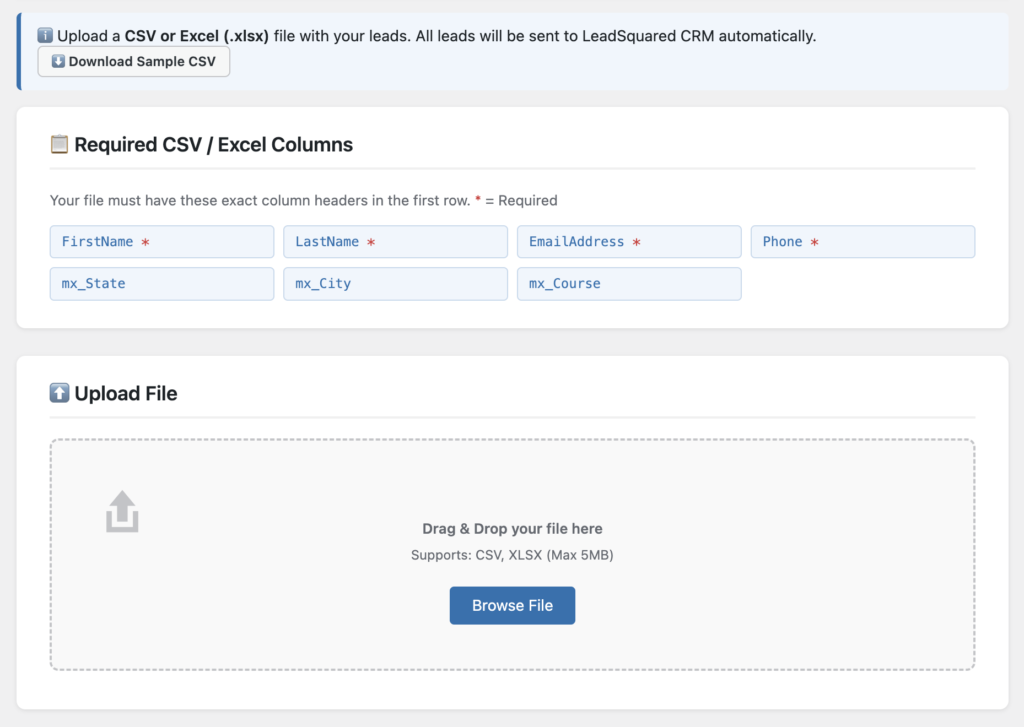
For all of these situations, you need a Bulk Lead Upload system directly inside your WordPress dashboard.
What the Bulk Upload Panel Does
We set up a dedicated upload section inside your WordPress admin panel — under a menu called Lead Upload. It gives you or your team a simple drag-and-drop interface to:
- Upload a CSV or Excel file containing hundreds or thousands of leads
- Preview the first few rows to confirm the data looks correct before sending
- Click one button to send all leads to LeadSquared automatically
- Watch a live progress bar as each lead is processed
- See a real-time count of how many leads succeeded and how many failed
✅ No technical knowledge needed. Anyone on your team — admissions staff, marketing executives, data entry operators — can use this themselves.
How Your CSV or Excel File Should Be Formatted
Your file must have the following column headers in the first row. The column names must match exactly:
Column Name | Required? | Example |
FirstName | ✅ Required | Rahul |
LastName | ✅ Required | Sharma |
EmailAddress | ✅ Required | rahul@gmail.com |
Phone | ✅ Required | 9876543210 |
mx_State | Optional | Bihar |
mx_City | Optional | Patna |
mx_Course | Optional | B.Tech (CSE) |
Rules for Clean Data in Your File
- No merged cells in Excel — each column should be its own clean cell
- No blank rows between data rows — blank rows will be skipped or cause errors
- Phone numbers should be plain digits — no dashes, brackets, or country codes
- Make sure email addresses are in valid format — name@domain.com
- Course names must match exactly what is in LeadSquared — no variations
- Save Excel files as .xlsx before uploading — not .xls or .csv from Excel
The Upload History Log
Every bulk upload is recorded inside WordPress with full details:
- Date and time of the upload
- File name that was uploaded
- Total number of leads in the file
- How many were successfully sent to LeadSquared
- How many failed — and why
- The name of the team member who uploaded it
✅ This gives your team full visibility over every lead upload — no more wondering whether a batch went through or how many leads were in that file.
Common Issues We See — And How We Solve Them
After setting this up for more than 20 organisations, we have seen the same problems come up again and again. Here is what to watch out for:
➙ Issue 1: The API URL is incomplete
The most common cause of integration failures. The LeadSquared API token is a 36-character code. If it is copied incompletely — with a ‘…’ at the end — every lead submission will be rejected. Always verify the full token is present. Test in Postman first to confirm.
➙ Issue 2: Form field names don’t match the payload
If your CF7 form has a field called ‘first_name’ but the integration is looking for ‘FirstName’, the data will not map correctly. Leads will arrive in LeadSquared with empty fields. Consistent naming throughout the setup is everything.
➙ Issue 3: Extra spaces in the Source value
LeadSquared is strict about the Source field. ‘ futureaxis ‘ with spaces before and after will be rejected. It must be exactly ‘futureaxis’ — no extra characters anywhere.
➙ Issue 4: Course names don’t match LeadSquared exactly
If your form says ‘B.Tech Computer Science’ but LeadSquared’s field expects ‘B.Tech (CSE)’, it creates a mismatch. Course names in your form and in your CRM must be letter-perfect.
➙ Issue 5: Integration breaks after a theme update
This happens when the code was added directly to the theme files instead of using Code Snippets. A theme update wipes the theme files — and your integration with them. Always use the Code Snippets plugin.
Need help implementing this solution on your website?
The expert team at Ixoric Technologies can help you set up the complete system quickly and efficiently.
What Changes After the Integration is Set Up
Over the past few years, we have worked with universities, engineering colleges, MBA institutions, real estate developers, and healthcare businesses. Every single one of them had leads getting lost between their website and their CRM.
Once the integration was set up, the difference was immediate:
- Admissions and sales teams stopped checking email for leads — everything was in LeadSquared
- Response times improved because leads arrived in the CRM the moment they came in
- Marketing teams could finally track which campaigns were driving enquiries
- Bulk offline data could be uploaded in minutes instead of hours of manual entry
- No more duplicate entries, missed leads, or Excel sheets passed around on WhatsApp
- Lead reports became accurate because source and campaign data was properly filled
💡 This is not just a technical improvement. It directly affects how quickly your team responds to enquiries — and how many leads actually get converted.
What You Should Do Next
If you are ready to set this up, here is the recommended order:
- Confirm you have WordPress with Contact Form 7 installed and active
- Install the Code Snippets plugin from the WordPress plugin directory
- Download Postman (free from getpostman.com)
- Get your complete LeadSquared API URL, token, Source, SourceCampaign, and SourceMedium values from your LeadSquared account manager
- Test your API in Postman with a sample lead to confirm it is working
- Set up your Contact Form 7 form with the correct field names and course dropdown
- Add the integration code via the Code Snippets plugin
- Test with a live form submission and verify the lead appears in LeadSquared
- Enable the Bulk Upload panel for your team to upload CSV or Excel files
📩 If you need help with any of these steps, or if you would like us to set this up for your organisation, feel free to reach out. We have done this for businesses across education, real estate, healthcare, and services.
Frequently Asked Questions
Q: We use WPForms or Gravity Forms, not Contact Form 7. Does this still work?
Yes. The integration approach and LeadSquared API remain exactly the same. Only the way form data is captured differs slightly between plugins. The setup is still straightforward.
Q: Will this slow down our website?
No noticeable impact for visitors. The API call happens in the background on the server — your visitors will not notice any difference in how fast the form responds.
Q: What if LeadSquared is temporarily unavailable when someone submits a form?
The lead submission will fail for that moment. We recommend adding a fallback that saves the lead data locally in WordPress as a backup so no lead is permanently lost.
Q: Can we have multiple forms with different campaign codes?
Yes. You can have multiple forms on different pages, each with their own Source and SourceCampaign tracking values. Each form sends leads to LeadSquared with its own tracking information.
Q: How long does the full setup take?
For an experienced developer, the real-time form integration typically takes one to two hours. The bulk upload panel adds another two to three hours. With testing and fine-tuning, the full setup is usually complete in a single working day.
Q: Do we need to change anything inside LeadSquared?
Very little. You mainly need your API URL and token from LeadSquared. Your account manager will provide the tracking values. All the work is done on the WordPress side.
This guide is based on real experience setting up WordPress to LeadSquared integrations for 20+ organisations across education, real estate, and healthcare sectors.


